
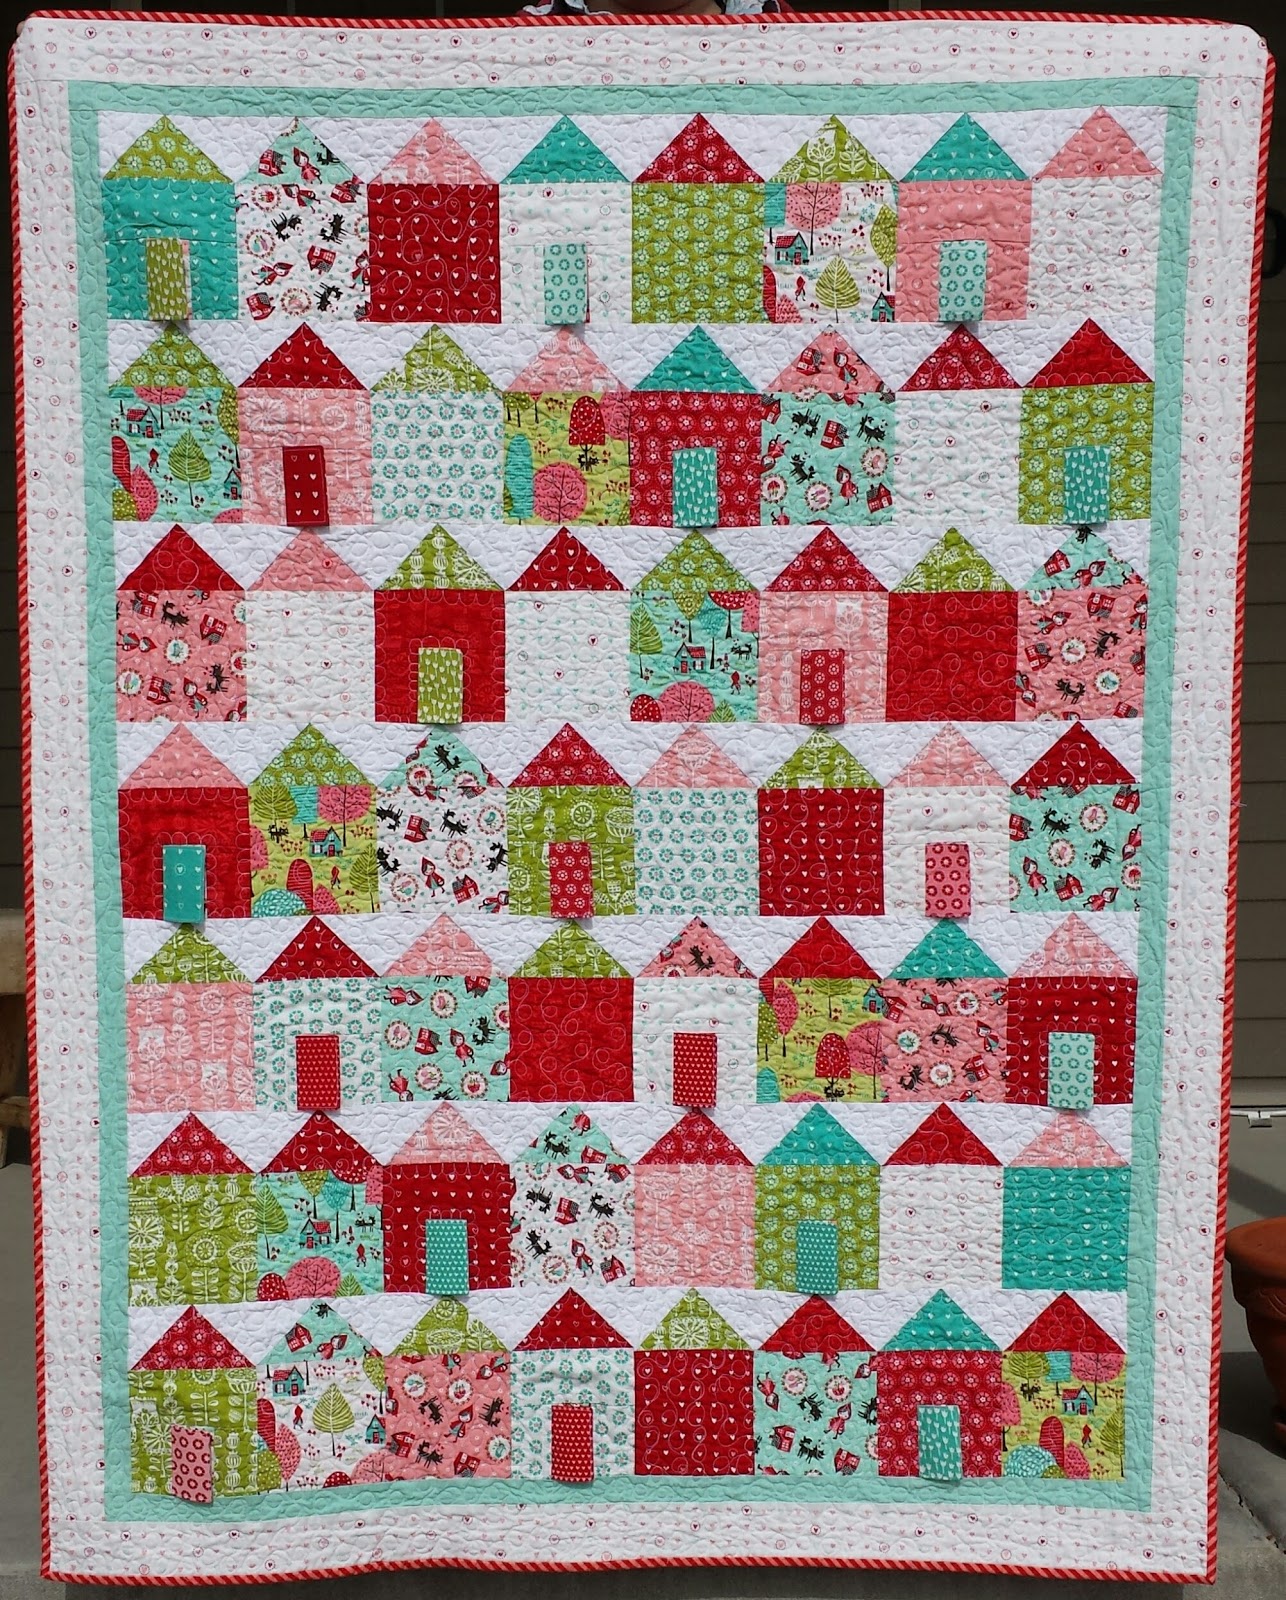
Hello my lovelies! Here I am returning to my rusty old forgotten blog because I've gotten so much love and so many sweet comments on Instagram over my new little baby quilt that I designed. So I'm going to share pictures and a tutorial on how I put the houses together. If there's one thing that I REALLY love, it's quilty houses. I've been inspired by so many adorable patterns out there. I wanted to make a somewhat simple looking house quilt for my new little great niece, and I knew I wanted to use the Lil' Red fabric line by Stacy Hsu. I was originally going to just do charm squares for the houses, with roofs made from half a charm square. But then I thought, how stinkin' cute would that be if there were little doors that opened with Little Red Riding Hood inside?!? Eeeeeeeek! ;-) How fun would it be for a baby to have tummy time on a lift-the-flap style quilt?

There is a bit of trickiness involved in this quilt. And because it was all experimental for me, I ran into some frustrations along the way. BUT, the finished quilt is so fun and so adorable, it was all worth it. I'm going to make a twin size (with bigger houses) for my daughter. She's IN LOVE with her little cousin's quilt! Anyway, hopefully my pictures and tips along the way will make it easy and less frustrating for YOU! It's probably best to read this whole (VERY LONG) thing before starting.And please be patient with me. This is really my first quilty creation and I am in no way, shape, or form a professional pattern writer! :-) But feel free to comment with any questions and I'll try to help!
So my quilt ended up about 44"x 55". I made a total of 56 houses, 19 of them had doors, the other 37 were made from a 5" square and a roof. I used a charm pack plus part of a FQ bundle, but you could just use fat quarters if you wanted to.
**You'll also need:
*3/4 yard background fabric, I used white.
*Pellon Craft Fuse (Style #808) This will be inside the doors as a stabilizer.

Cut out 5" squares (charm squares) for each plain house from desired fabric.
Cut 56 - 5"x 2.75" rectangles for the roof pieces.
Cut 112 - 2.75" white squares for the corners above the roofs. Draw a diagonal line on each white square.
For each plain house, without the doors, you'll need a 5" square, and for the roof, one 5"x 2.75" rectangle, and two 2.75" white squares.

You'll piece the roof together, like flying geese, then attach it to the house. Quick and easy!

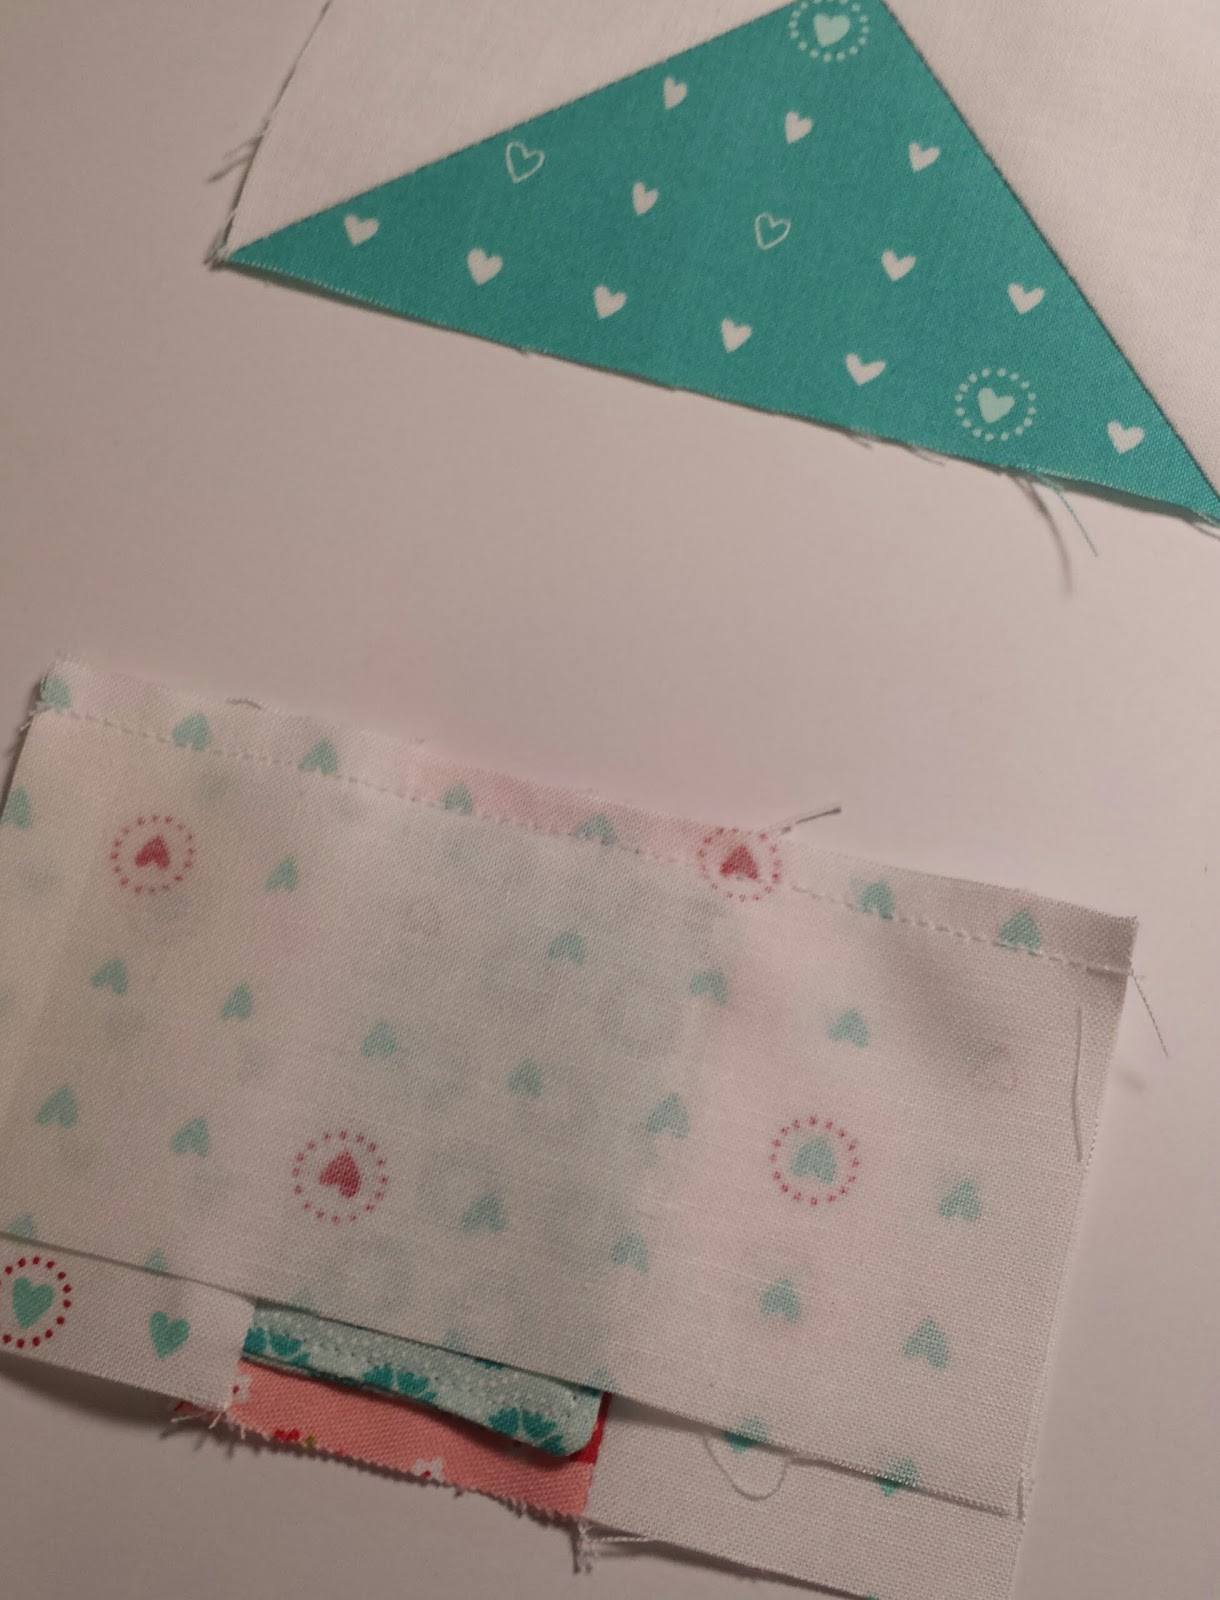
Now for the door houses! You may want to do what I did, I made one house to make sure I got it all right, before I went and cut out all the house pieces. ALSO, I just wanted to point out that this print from the "Lil Red line worked out PERFECTLY for the doors!

I used the little pictures as the "peek-a-boo" pictures inside some of the doors, and I used the little floral squares as the fronts and backs of the doors! I used 2 fat quarters and it worked out almost perfectly. I did cut 1 or 2 doors from other fabrics and I used another print for some of the "peek-a-boo" pictures.
Here are some of my fussy cut 3"x 2" "peek-a-boo" pictures for the insides of the doors:

So here are the measurements.
**You'll need the same size roof pieces as above.
**For the house:
*Fussy cut a 3"x 2" rectangle for the peek-a-boo picture inside the door.
*For the 2 side walls, cut two 3"x 2" rectangles.
*For the top piece above the door, cut a 2.5" x 5" rectangle from the same fabric as the 2 side walls.
*For the door, cut two 3"x 2" rectagles from a contrasting fabric, and one 2.5"x 1.75" rectangle from the Pellon Craft Fuse.

Let's make the door!
Lay your piece for the front of the door right side down on your ironing board. Follow the Pellon instructions to iron the rectangle of Craft Fuse with the SHINY SIDE DOWN against the WRONG side of the door. Make sure the edges are lined up on one side, and there should be 1/4 inch seem allowance on one side, and the top and bottom. Like this:

Next, place both door pieces right sides together, stitch around all 3 sides, 1/4" away from the edge, JUST on the outside of the Craft Fuse, trying not to stitch over it. You will want to back stitch when you start and stop. This will make it easier to turn without undoing your stitches. Clip your corners, being careful not to clip your stitches.

Carefully turn your door right side out, gently poking the corners out. Note: the Craft Fuse is not permanent and might come a little bit loose while you're turning. After you turn the door, press flat with a hot iron, then top stitch approximately 1/8" away from the edge,just on the 3 sides. The top stitch gives it a finished look AND keeps the Craft Fuse from shifting or wadding over time. Don't worry about the open side of the door, this is where it will be stitched onto the wall. :-)

The door may seem a little tricky at first,but once you make 2 or 3, they're super fun and easy!
Now let's piece the door and house together!
Lay your pieces out with your door on top of your peek-a-boo picture, lined up along the left edge, leaving 1/4"seem allowance around the other 3 sides. (Hopefully my pictures are less confusing than my words!) O_o

Then lay your left wall piece, right side down, on top of your door.

Pin the pieces in place so your door doesn't shift while sewing, and stitch all 3 pieces together. (You're stitching down the left side of the door. I turned it upside down before stitching.)

Now open your wall and press with the seem allowance going in the direction of your wall, this way the bulk of the door should not have to be folded at all. TA-DA! :-)

Next you're going to open your door up out of the way and stitch your right wall piece onto the right side of your peek-a-boo piece.

Press open and then stitch the top piece along the top.
Next add your roof piece and VOILA! You have a house with an opening door! There should still be 1/4" seem allowance below the door. This is where you'll sew your rows together.

Once I got a couple tester houses done, I cut out the rest of my house pieces, and laid them all out so that the peek-a-boo pictures, the doors, and the walls were all contrasting. Then I had a little chain-piecing party!

And I actually stitched all of my houses together and BEFORE attaching all of the roofs, I laid them out so I could decide which roof I wanted on which house and what order I wanted the houses in. THEN i attached all the roofs and sewed each row together.


You'll want to pin 2 rows together at each intersection between the houses.
NOW.... Sewing the rows together can be a little bit tricky because you're going to be sewing along the the bottom, right below the door,but you don't want to catch the door in your stitches. I'm holding the top layer out of the way so you can see what I mean.

So what I did was, when I got close to the door with my stitching, I stopped, with the needle down, reached in between the fabrics and gently pulled the door away from the needle, until I stitched below it. Like in this picture:

You'll sew across the top, like this, while gently holding the door up out of the way, from underneath. (I hope that's not confusing.)

When you press the rows open, you should end up with the bottom of each door right above the point of a roof.


YAY!!!
I bordered the whole neighborhood with a 1" (1.5" cut) border of aqua. I think this sort of put a break between the business of the houses and the outside border. Then I put another 3" printed border around that.
And lastly...
Here are some QUILTING TIPS that might come in handy!
I quilt most of my quilts myself with my sewing machine. I tried doing straight line quilting, which I have never done on anything bigger than a mini. As it turns out, I need A LOT more practice before attempting a big quilt. Besides, it is VERY time consuming. I have a lot of respect for people with THAT much patience, I got about 13 quilting lines in and realized it was looking very wonky and
it was going to take me until next Christmas! SOOOOO.... I picked it all out. GROSS. I know. :-(
So I decided to do a free motion circly-loopedy-loop pattern all over. BUT, in the houses that have doors, I did something different. I wanted to make sure I quilted over the seem allowance of each door for a little extra sturdiness. So I did a little scallopy type thing around the inside of the roof, the inside of the house and the OUTSIDE of each door. You will have to kind of wiggle the door around so you can see where you're quilting and NOT quilt over the edge of the door. I did NOT quilt in the inside of the door. I tried it on the first house, but holding the door open created an extra thickness, which caught my quilting foot, broke it, and I had to run out and buy a new one! SO there's my advice on that! :-) Here's a close up of my quilting, so you can see. I am, by no means, a pro at it, but I like to practice and try different things. And once it's washed and crinkled up, it's a lot more forgiving. ;-)

Well, that's it friends! If you've actually stuck with me until the end of this very long post, then you deserve a prize! HAHA!
Here's the finished front and back and then I'll say good night and go to bed! If you want to make this quilt,I would love to see your version on Instagram! Use the hashtag #quiltmeahousequilt and tag me @sewlizzy5 I'd love to see what you come up with!


Happy Quilting!
Oh! Also! P.S. After washing and drying the quilt, each door did come out just a little bit on the curly side. But I just pressed each one for only a second or two with a hot iron and they flattened right out with no problem! :-) The end!


.jpg)


